Git工作流程
代码提交与同步

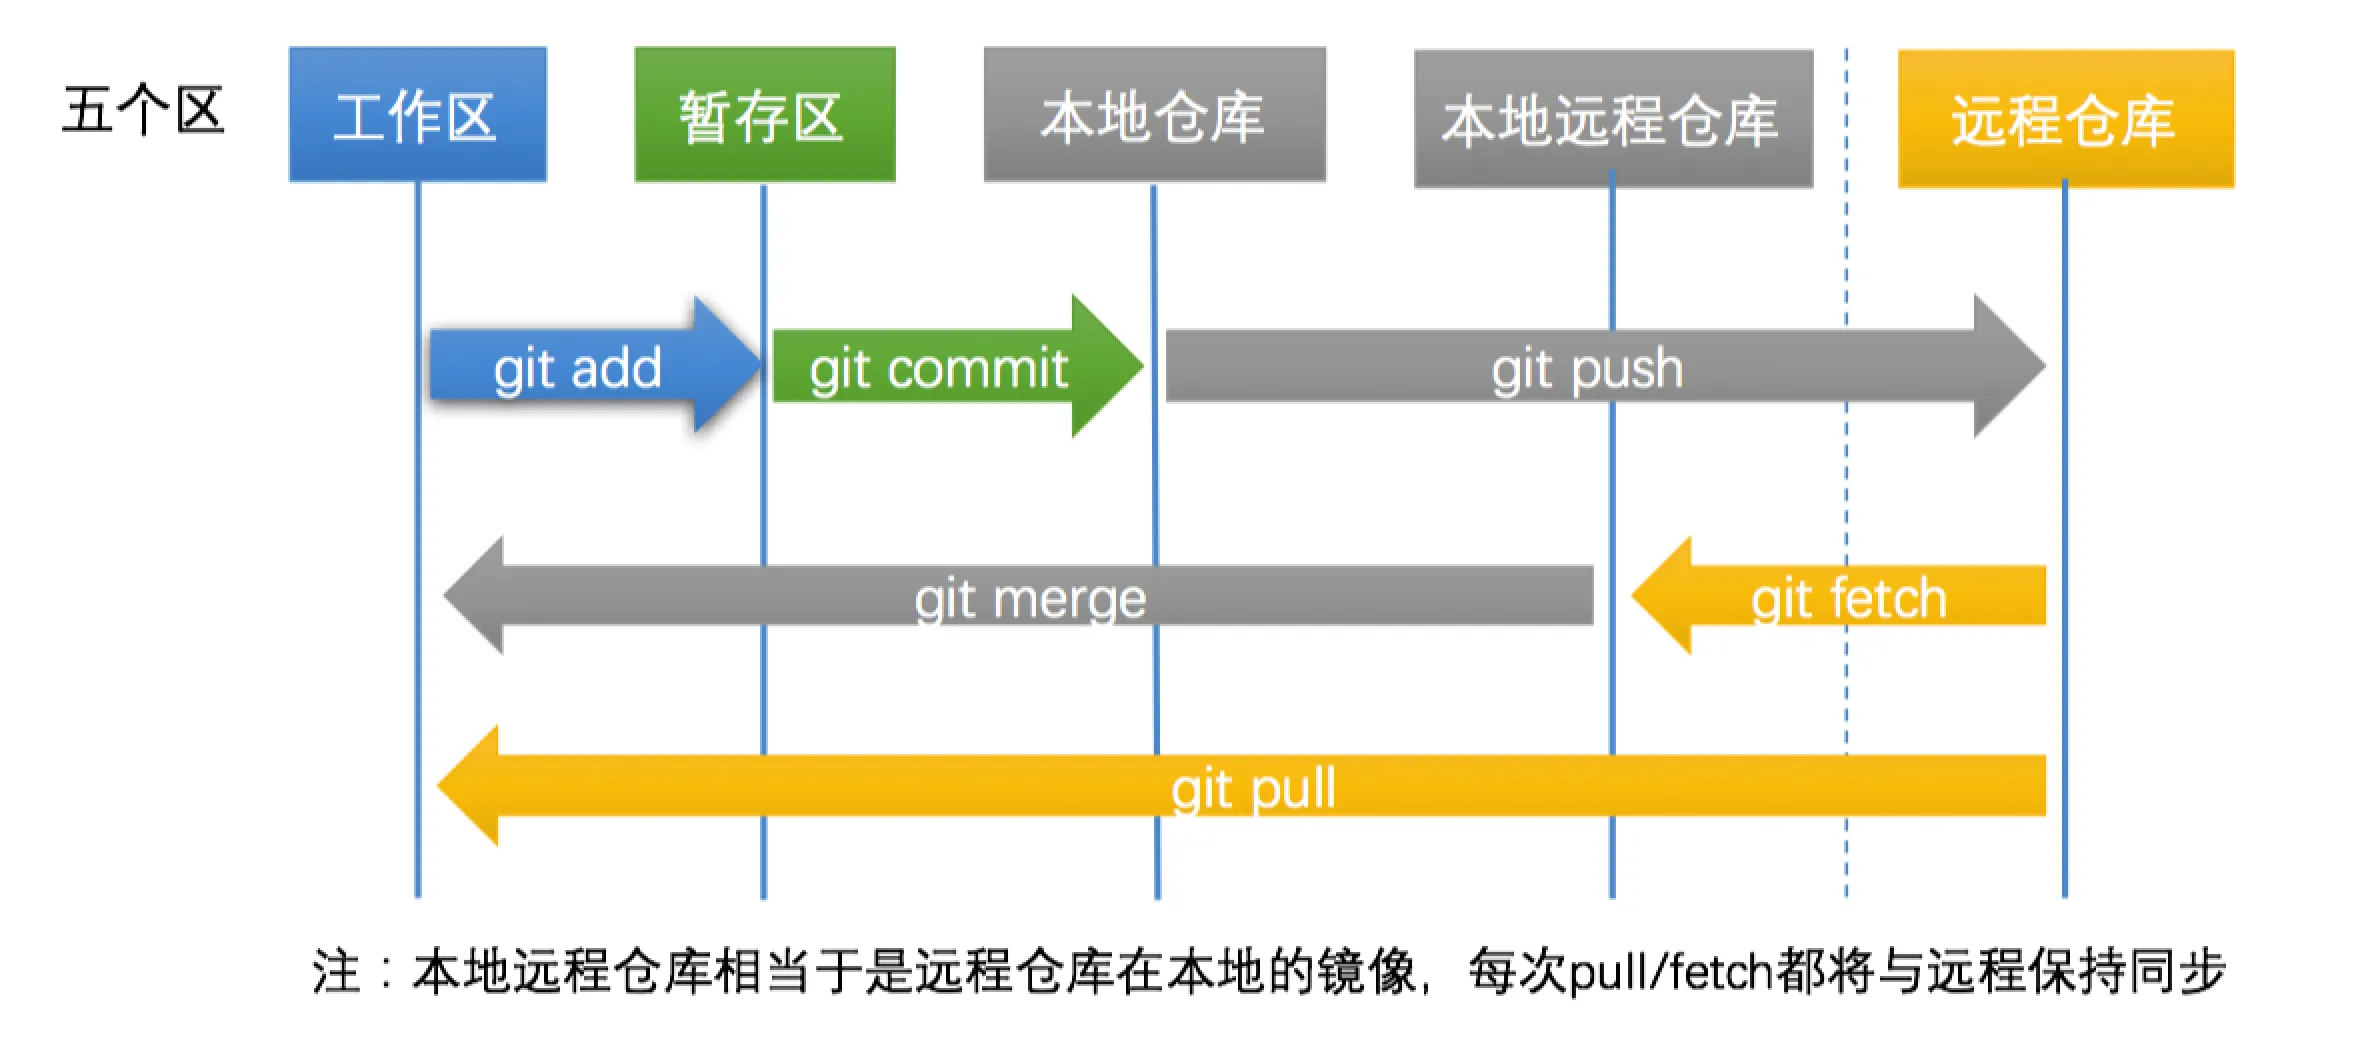
Git 的工作区域分为五个部分:工作区、暂存区、本地仓库、本地远程仓库(远程仓库的本地镜像)、远程仓库。
提交流程:
- 文件增删改,变为已修改状态
git add,变为已暂存状态git commit,变为已提交状态git push,变为已推送状态
1
2
3
4
5
6
|
git status
git add .
git commit -m "commit描述"
git pull --rebase
git push origin <branch>
|
代码撤销与回退
常用命令速查
基础操作
1
2
3
4
5
6
7
8
9
10
11
12
13
14
15
16
17
18
|
git status
git add --all
git add .
git add xx/xx.py
git commit -m "描述"
git push -u origin master
git push
git branch
git branch -a
|
分支管理
1
2
3
4
5
6
7
8
9
10
11
12
|
git checkout -b <new-branch>
git checkout <branch-name>
git merge <branch-name>
git branch -d <branch-name>
git push origin --delete <branch-name>
|
暂存工作区
1
2
3
4
|
git stash
git pull
git stash pop
|
远程仓库管理
1
2
3
4
5
6
7
8
9
10
11
12
13
14
15
16
17
|
git remote add origin <url>
git remote add coding <url>
git remote -v
git remote set-url origin <new-url>
git clone <url>
git clone -b <branch> --depth 1 <url>
git clone http://用户名:密码@仓库地址
git clone -b master --depth 1 http://admin:123456@192.168.0.1/demo/demo.git
|
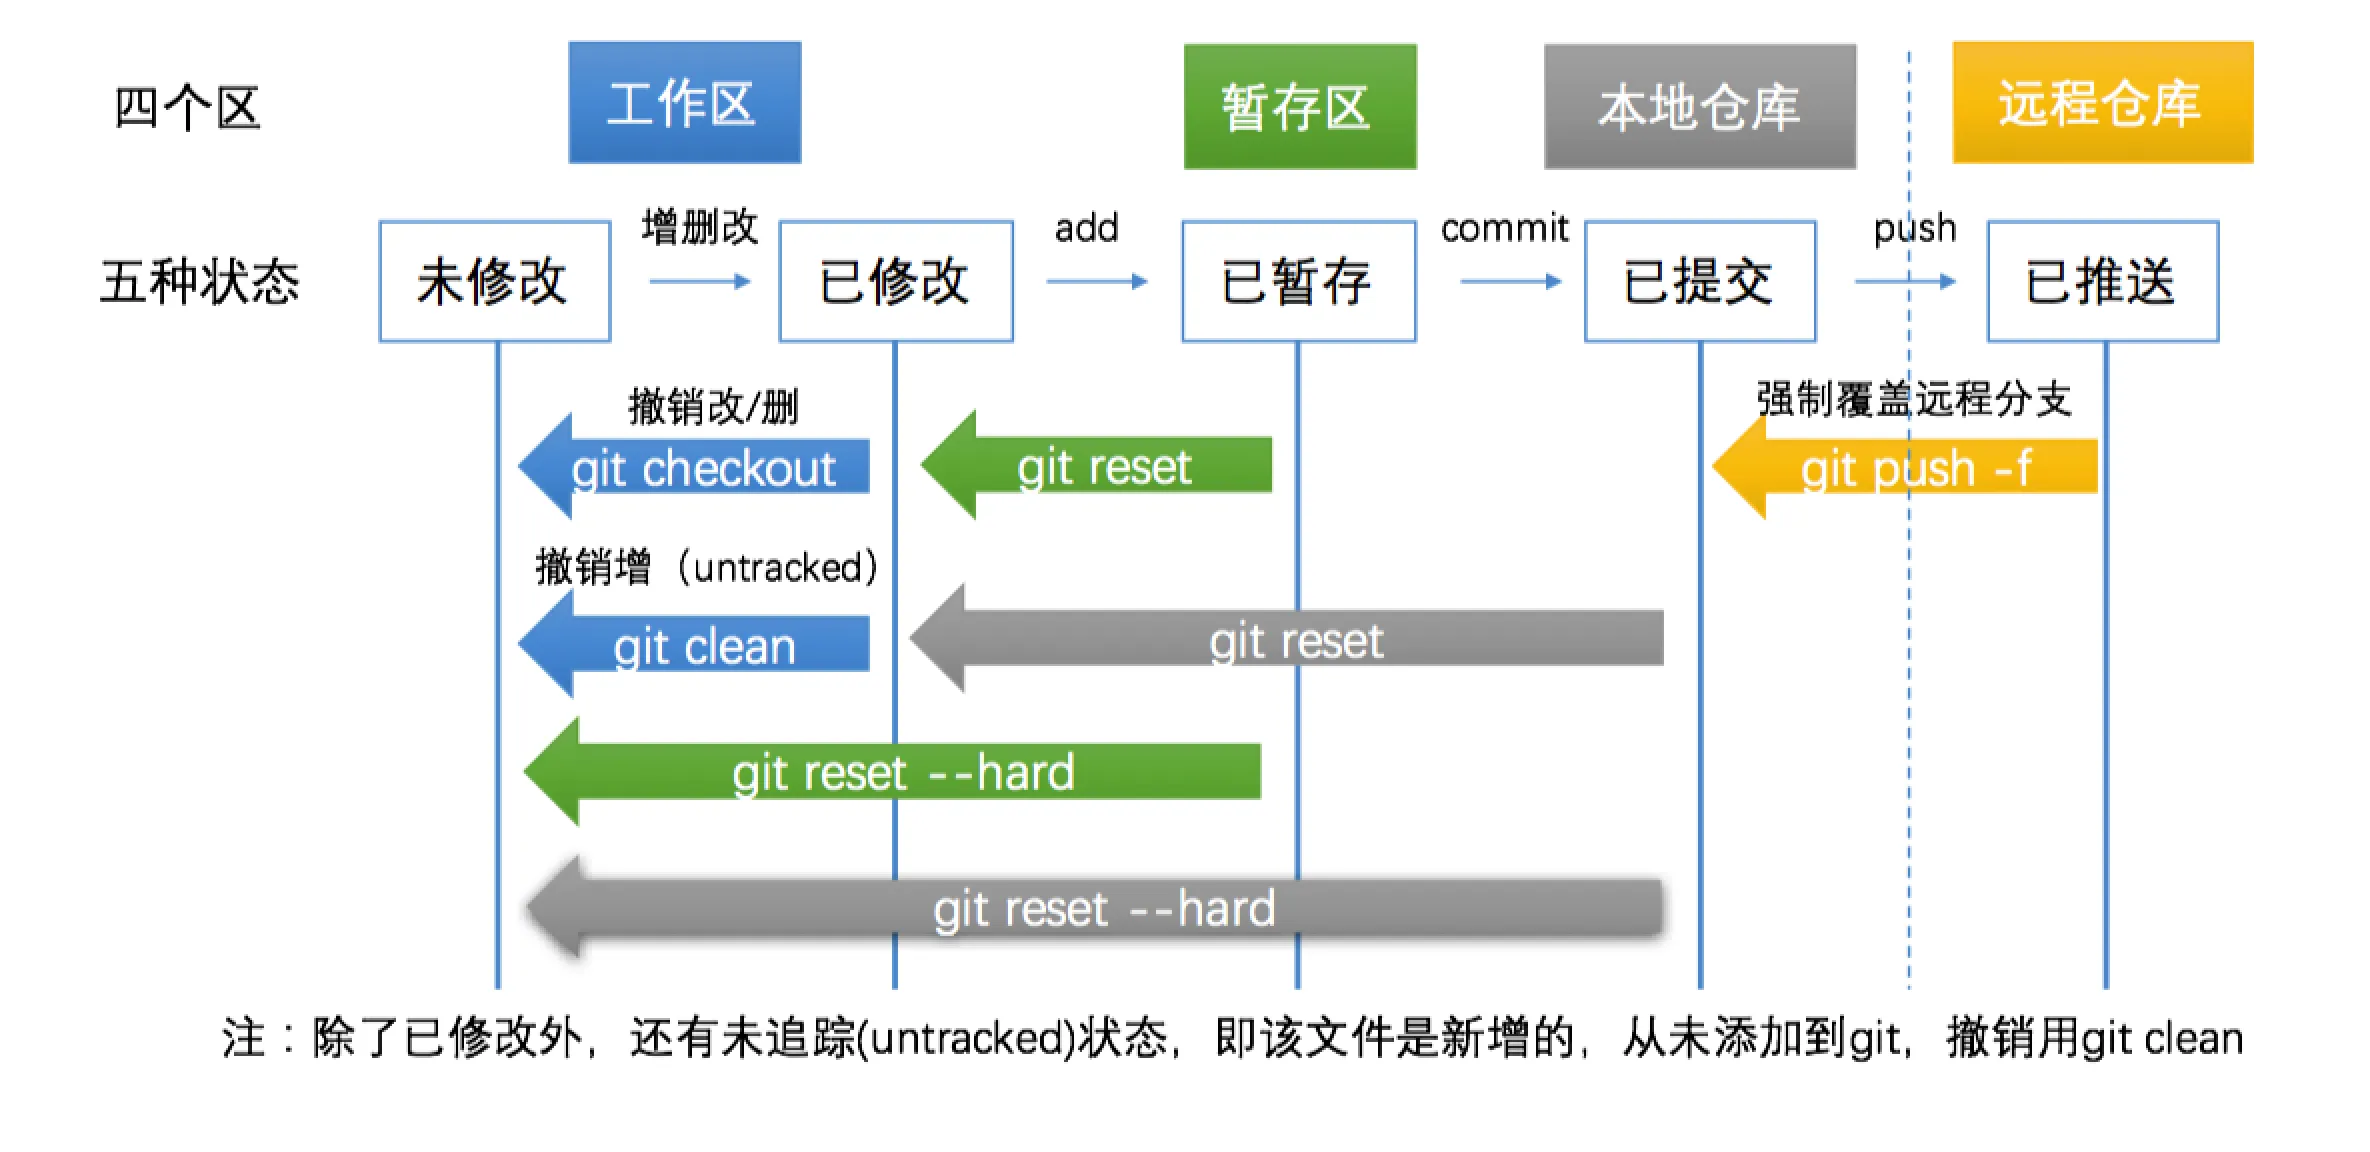
撤销操作详解
撤销已修改(未暂存)
1
2
3
4
5
6
| git diff
git diff xx/xx.py
git checkout .
git checkout xx/xx.py
git clean -f
git clean -df
|
撤销已暂存(未提交)
1
2
3
4
| git diff --cached
git reset
git reset --soft
git reset --hard
|
撤销已提交(未推送)
1
2
3
4
| git reset --hard HEAD^
git reset --hard HEAD^^
git reset --hard <hash>
git revert <commit-hash>
|
撤销已推送
1
| git push -f origin master
|
reset回退错误恢复
1
2
| git reflog
git reset --hard HEAD@{5}
|
版本回退与前进
1
2
3
4
5
6
7
8
9
10
11
12
13
14
15
|
git log
git log --graph --decorate --abbrev-commit --all
git checkout <hash>
git reset --hard <hash>
git commit --amend
git commit --amend --reset-author
|
进阶操作
修改历史commit
1
2
3
4
5
6
7
8
9
10
11
12
13
14
15
16
|
git rebase <commit-hash>^ --interactive
git add .
git commit --amend
git rebase --continue
git push origin <branch> -f
|
合并多个commit
1
2
3
4
5
6
7
8
9
10
11
12
13
|
git rebase -i HEAD~4
pick <hash> 第一次提交
squash <hash> 第二次提交
squash <hash> 第三次提交
git rebase --abort
git push origin <branch> -f
|
Rebase操作
1
2
3
4
| git fetch --all
git rebase origin/master
git rebase -i HEAD~4
git rebase -i <commit-hash>
|
Cherry-pick操作
1
2
3
4
5
| git cherry-pick <commit-hash>
git add .
git commit --amend
git cherry-pick --continue
git push origin <branch> -f
|
Patch操作
1
2
3
4
5
6
7
|
git format-patch -s -2
git format-patch <hash1>^..<hash2>
git am <patch-file>
git apply --check <patch-dir>/*.patch
|
Subtree操作
1
2
3
4
5
6
7
8
9
10
11
|
git subtree add --prefix=<子目录名> <remote-url> master
git subtree pull --prefix=<子目录名> <remote> <branch>
git subtree push --prefix=<子目录名> <remote> <branch>
git subtree split -P <子目录名> -b <新分支名>
|
多平台SSH配置
当需要同时使用 Github、Gitlab、Gitee 等多个平台时,需要为每个平台配置独立的SSH密钥。
1. 清除全局设置
1
2
3
4
5
6
|
git config --global --list
git config --global --unset user.name
git config --global --unset user.email
|
2. 生成SSH密钥
为每个平台生成独立的SSH密钥:
1
2
3
4
5
6
7
8
|
ssh-keygen -t rsa -f ~/.ssh/id_rsa.github -C "your-github-email@example.com"
ssh-keygen -t rsa -f ~/.ssh/id_rsa.gitlab -C "your-gitlab-email@example.com"
ssh-keygen -t rsa -f ~/.ssh/id_rsa.gitee -C "your-gitee-email@example.com"
|
完成后会在 ~/.ssh/ 目录下生成对应的密钥文件。
3. 添加SSH密钥到ssh-agent
1
2
3
4
| ssh-agent bash
ssh-add ~/.ssh/id_rsa.github
ssh-add ~/.ssh/id_rsa.gitlab
ssh-add ~/.ssh/id_rsa.gitee
|
4. 配置SSH Config文件
在 ~/.ssh/ 目录下创建或编辑 config 文件:
1
2
3
4
5
6
7
8
9
10
11
12
13
14
15
16
17
18
| # Github
Host github.com
HostName github.com
User git
IdentityFile ~/.ssh/id_rsa.github
# Gitlab
Host gitlab.com
HostName gitlab.com
User git
IdentityFile ~/.ssh/id_rsa.gitlab
# Gitee
Host gitee.com
Port 22
HostName gitee.com
User git
IdentityFile ~/.ssh/id_rsa.gitee
|
配置字段说明:
Host: SSH连接的别名,可用于替代服务器地址HostName: 实际连接的服务器地址Port: 端口号,默认22User: 用户名,默认gitIdentityFile: 指定使用的密钥文件
5. 添加公钥到平台
将对应的公钥内容添加到各平台的SSH Key设置中:
1
2
3
4
|
cat ~/.ssh/id_rsa.github.pub
cat ~/.ssh/id_rsa.gitlab.pub
cat ~/.ssh/id_rsa.gitee.pub
|
6. 测试连接
1
2
3
| ssh -T git@github.com
ssh -T git@gitlab.com
ssh -T git@gitee.com
|
看到 Welcome 或 Successfully authenticated 信息即表示配置成功。
Git LFS 大文件管理
当仓库中需要管理大文件时,使用 Git LFS(Large File Storage)。
安装
1
2
3
4
5
6
7
8
|
yum install git-lfs
apt install git-lfs
git lfs install
|
使用
1
2
3
4
5
6
7
8
9
10
11
12
13
|
git lfs track "*.gz"
git lfs track "path/to/large-file"
git lfs track
git lfs ls-files
cat .gitattributes
git add large-file.gz
git commit -m "add large file"
git push origin master
|
Git配置与别名
基础配置
1
2
3
4
5
6
7
8
9
10
11
12
|
git config --list
git config --global user.name "Your Name"
git config --global user.email "your@email.com"
git config --global color.status auto
git config --global color.diff auto
git config --global color.branch auto
git config --global color.interactive auto
|
常用别名
1
2
3
4
5
| git config --global alias.st "status"
git config --global alias.co "checkout"
git config --global alias.br "branch"
git config --global alias.ci "commit"
git config --global alias.lg "log --graph --decorate --abbrev-commit --all"
|
GitLab CI/CD 配置
Docker方式部署Runner
1
2
3
4
5
6
7
8
9
10
11
12
13
14
15
16
17
|
docker pull gitlab/gitlab-runner:latest
docker run -d --name gitlab-runner --restart always \
-v /srv/gitlab-runner/config:/etc/gitlab-runner \
-v /var/run/docker.sock:/var/run/docker.sock \
gitlab/gitlab-runner:latest
docker exec gitlab-runner gitlab-runner register \
--non-interactive \
--name my-runner \
--url http://192.168.1.1:8000/ \
--registration-token <your-token> \
--executor shell \
--tag-list common-runner
|
宿主机安装Runner
1
2
3
4
5
6
7
8
9
10
11
12
13
14
15
16
17
|
curl -L https://packages.gitlab.com/install/repositories/runner/gitlab-ci-multi-runner/script.rpm.sh | bash
yum install -y gitlab-ci-multi-runner
cat > /etc/yum.repos.d/gitlab-ci-multi-runner.repo << EOF
[gitlab-ci-multi-runner]
name=gitlab-ci-multi-runner
baseurl=https://mirrors.tuna.tsinghua.edu.cn/gitlab-ci-multi-runner/yum/el7
repo_gpgcheck=0
gpgcheck=0
enabled=1
gpgkey=https://packages.gitlab.com/gpg.key
EOF
yum makecache
yum install -y gitlab-ci-multi-runner
|
注册Runner
1
2
3
4
5
6
7
8
9
10
11
12
13
14
15
16
17
18
19
|
gitlab-runner register \
--non-interactive \
--name my-runner \
--url http://192.168.21.8:8000/ \
--registration-token <your-token> \
--executor shell \
--tag-list common-runner
docker exec -it gitlab-runner gitlab-ci-multi-runner register
gitlab-runner list
|
获取Token位置: GitLab项目 → Settings → Pipelines → Specific Runners
编写 .gitlab-ci.yml
1
2
3
4
5
6
7
8
9
10
11
12
13
14
15
16
17
18
19
20
21
22
23
| stages:
- build
- test
- deploy
build_job:
stage: build
script:
- make build
test_job:
stage: test
script:
- make test
deploy_job:
stage: deploy
script:
- make deploy
only:
- master
tags:
- common-runner
|
stages 执行规则:
- 所有build阶段的jobs并行执行
- build全部成功后,test阶段的jobs并行执行
- test全部成功后,deploy阶段的jobs并行执行
- 任意阶段失败,后续阶段不会执行
when 字段可选值:
on_success:前一阶段所有job成功时执行(默认值)on_failure:前一阶段至少一个job失败时执行always:无论前一阶段状态如何,始终执行manual:手动触发执行
完整示例:
1
2
3
4
5
6
7
8
9
10
11
12
13
14
15
16
17
18
19
20
21
22
23
24
25
26
27
28
29
30
31
32
33
34
| stages:
- build
- cleanup_build
- test
- deploy
- cleanup
build_job:
stage: build
script:
- make build
cleanup_build_job:
stage: cleanup_build
script:
- cleanup build when failed
when: on_failure
test_job:
stage: test
script:
- make test
deploy_job:
stage: deploy
script:
- make deploy
when: manual
cleanup_job:
stage: cleanup
script:
- cleanup after jobs
when: always
|
参考资料
学习资源推荐
官方文档
在线练习
参考文章